

how much to fix oil leak
Transmission fluid is the lifeblood of every automobile. Not only does is remove heat from the internal components of your transmission, but it also actuates gear changes through hydraulic pressure.
Need a replacement transmission? Get an estimate for replacement transmissions and local installation. Look up your transmission model by vehicle make and model.
What Transmission Do I Have?
![]()
So if your transmission starts to leak, you're probably looking at the start of what could become a very expensive problem. The following article is designed to help you determine the cause of the leak, and the best way to fix it.
- Average Leak Repair Cost
- 5 Common Causes of Transmission Fluid Leaks
- How to Fix a Transmission Fluid Leak
Average Leak Repair Cost
The average cost to fix a transmission fluid leak that can be solved without removing the transmission is $150 to $200. This includes small repairs such as replacing fluid lines, gasket, seals, drain plugs or pan bolts.
The cost depends mostly on where the leak is. If its leaking from the front seal then the transmission will have to be taken out and the final price will be more expensive.
5 Common Causes of Transmission Fluid Leaks
1) Cracked Fluid Lines
Transmission lines are used to route ATF from the transmission pan to a cooling chamber inside/outside of the radiator. As the transmission fluid passes by moving parts, it absorbs heat, which it then expels as it's forced through the aluminum transmission cooler. These lines are typically rubber, or rubber with metal screw-type fittings at each end. And they can start to leak due to dry-rot, or damage.
2) Pan Gasket
The transmission pan gasket is the most common source of fluid leaks. Over time, the material can degrade, allowing ATF to escape onto your driveway (it only takes a few drops to make a big puddle). It can also leak if it wasn't lined up correctly when it was installed.
3) Leak in the Pan
Located at the very bottom of the gearbox, the transmission pan is one of the most vulnerable parts on your vehicle. It's generally made out of thick metal, but it's still susceptible to cracks and punctures from road debris.
Transmission pan damage can also be caused by bottoming-out on a deep pothole, or running over a tall kerb. If this serious damage occurs, you'll have to replace the transmission pan. But first, make sure that one of the bolts didn't just work its way loose.
4) Broken Seals
In order to maintain hydraulic pressure, an automatic transmission employs numerous seals. These transmission seals can naturally crack and fray over time. But exposing them to intense heat (which is often caused by dirty ATF) can also cause seals to crack.
If this happens, you'll have lots of potential sources for a transmission leak. Some of the culprits include the transmission pan gasket, the input/output shaft seal, sensor and plug seals, the speedometer input seal, shifter housing seal, tailhousing seal, along with numerous internal seals.
5) Torque Converter
 Located between the transmission and the engine flywheel, a torque converter uses ATF and a series of internal turbines to convert horsepower into the hydraulic pressure needed to operate the transmission. Although it's made almost entirely of metal, there's lots of internal bearings and turbine blades that can wearout and cause a transmission fluid leak.
How to Fix a Transmission Fluid Leak
Step 1: Identify the Fluid
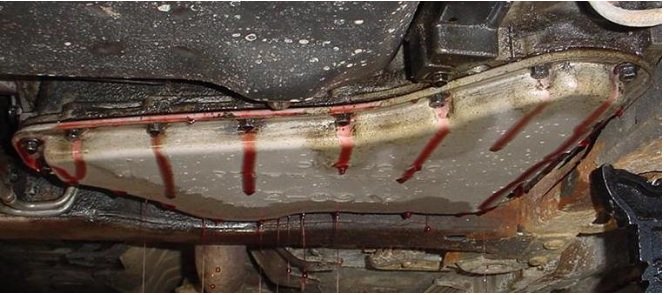
Transmission fluid is often a translucent reddish color, but it can turn dark red, brown or black as it ages. It also has a mildly sweet smell, unlike the pungent odor that's given off by motor oil. It's usually pretty easy to tell the difference between a transmission fluid leak, and a motor oil leak.If you've neglected your transmission the worn out fluid can sometimes resemble blackish/brown motor oil. If you've just discovered a leak, check both the motor oil and ATF levels to see what each looks like. If you still can't identify the leaking fluid, try placing a clean panel of cardboard under the vehicle to catch a few fresh drips.
Step 2: Locate the Source
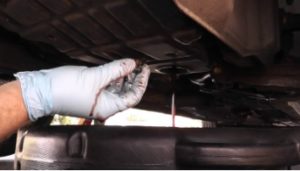
The source of a transmission leak can sometimes be difficult to locate. One of the best ways to determine where a leak is coming from, is to start with a clean slate. To do this, clean the entire undercarriage of the vehicle with degreaser or brake cleaner. Get all of the gunk and dirt off of the underside of the engine, transmission, frame and floorpan.Once you've got a clean undercarriage to work with, drive the car around the block, then park it on a piece of cardboard. When the leak returns, use a bright LED-type flashlight to inspect the transmission and all of its components.
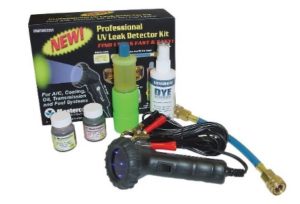 If you're still unable to figure out where your transmission leak is coming from, you might want to use an automotive leak detection kit. These kits usually come with a bottle of petrolium-based fluorescent dye, a UV light, and tinted glasses to amplify the UV light and colored dye.
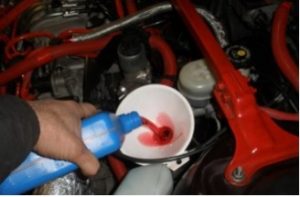
Once the underside of your vehicle is clean, pour the prescribed amount of dye into the transmission fluid, then drive the vehicle for as long as is necessary for the transmission to start leaking. Then, use the glasses and UV light to locate the source of the leak.
Step 3: Determine if You Can Fix it Yourself
Many transmission problems will require the talents of an experienced mechanic. However, if you feel that you possess the necessary skills to fix your leaking transmission, there are some repairs that can be performed in your own garage/driveway. But we'll get to those in a minute…
If the idea of performing your own transmission repairs seems a bit far-fetched, then you need to determine the severity of the problem. It only takes a few drops of ATF to make a dinner plate-size puddle, and depending on how badly the transmission is functioning, you might be able to top-off the transmission fluid and drive (slowly and carefully) to the repair shop. If your ATF puddle looks more like a small red lake, then you might want to consider calling a tow truck.
Step 4: Gather the Necessary Tools & Materials
Assuming that you've determined the cause of the transmission leak, and you've elected to repair the problem yourself, you need to gather the necessary tools and supplies.One of the first (and most helpful) things to get is a vehicle-specific shop manual, from a publisher like Haynes or Chilton. These are available from your local auto parts store, and they'll usually give you step-by-step instructions on how to fix the problem, along with a parts and tool list. You can also look on YouTube, as you'll often find helpful videos by mechanics who've tackled similar problems.
Other tools and materials that you might need:
- Jack, jackstands, or ramps
- Metric/Standard socket and wrench sets
- Vise-Grips
- Channel-locks
- Pliers / needle-nose pliers
- Screwdrivers
- Gloves
- Flashlight
- Shop towels / rags
- Large catch pan
- Tarp / cardboard (to prevent a mess)
- Bag of Cat Litter to cleanup that bit of the mess you couldn't prevent
- Correct type of ATF (check owners manual)
- Funnel
- Replacement parts
- Beer/Aspirin (optional)
Step 5: Drain the Fluid
 Now for the fun part! Some automatic transmissions have a drain plug, which allows you to simply jack up the vehicle, place the cardboard and catch pan underneath the transmission pan, and drain the ATF. Many however, don't have a drain plug. So to drain the fluid, you have to carefully unbolt the transmission pan.
As you do this, the transmission fluid will start to drain, so make sure the catch pan is underneath, and try to keep yourself clear of the red/brown/black waterfall. For best results, leave the bolts on one side of the pan loose (but still attached), while you remove the bolts on the other side. Then push up on the pan, remove the rest of the bolts, then carefully lower the pan and dump the rest of the fluid into the catch pan.
Step 6: Fix the Problem
Replacing Fluid Lines
Transmission fluid is circulated at a fairly high pressure, so you're going to need a rubber hose that can withstand both high temperature and pressure. If you have a leaking transmission line, it's highly recommended that you replace the entire line. You can splice in a new section of hose (on a low-pressure return line), but hose clamps and a bit of tubing will only last for so long.
If your leak is coming from a pressurized cooler line (the ones with the metal ends), you have no choice but to replace the entire line. But make sure that you correctly seat the little rubber o-rings before you screw in the fittings. Otherwise you will have another leak.
Change the Gasket
Changing the transmission pan gasket is probably the easiest leak to fix. Assuming that you've already removed the pan and drained the fluid, you just need to clean off the remnants old gasket, and install the new one. It's also a good idea to install a new transmission filter while you're at it.
Replacing the Pan
If your transmission pan is damaged, you're going to need to replace it. You could order a brand new one from an auto parts store, or the dealer. But you can usually save a couple dollars by getting a used one at a salvage yard. Installation is as simple as removing the old one and bolting the new one in place (you'll obviously need a new pan gasket).
Installing New Seals
If you've got a ruptured transmission seal, replacing it is pretty straightforward. Assuming you've determined which seal is bad, all you've got to do is remove the remnants of the old seal, then install the new one. But you've got to make sure that the new seal is seated correctly. Otherwise, you're going to have to take everything apart and fix the problem again.
Installing New Drain Plugs or Pan Bolts
It's possible to have a transmission leak due to worn out/loose pan bolts or drain plugs. If you discover a loose fastener or plug, you might want ask why it came unscrewed? Was it excessive vibration from rough roads, or was it a loose/misaligned part?
There's a possibility that the bolt had worn threads, and a bumpy road jarred it loose. To find out, install a new bolt, and be careful not to damage / crush the gasket. If the problem returns, you might want to check the driveshaft alignment, or the transmission mounts.
Step 7: Refill the Transmission
 Once you've repaired the problem, lower the vehicle and refill with the correct type of transmission fluid. There are numerous types of ATF, including Dexron III / VI, Mercon V, ATF+4, ATF+5, and many manufacturer-specific blends like Toyota Type T-VI and Nissan J-Matic. The difference is in the chemical composition, which has been formulated to work with a particular transmission's heat and wear characteristics. Using the wrong ATF can result in friction and heat damage to the seals and internal components. It's best to refill the transmission to within ½ to 1 quart of its fluid capacity (the auto part store can give you this information), then start the engine, check the level, and continue adding ATF. This will help you to add the right amount of fluid and avoid overfilling.
Next, check for leaks, shift through all the gears to circulate the fluid, and take it for a test drive. Assuming there were no driving issues, check for leaks and check the fluid level one more time.
Oh, and don't forget to cleanup your mess.
Need a replacement transmission? Get an estimate for replacement transmissions and local installation. Look up your transmission model by vehicle make and model.
What Transmission Do I Have?
![]()
What to Read Next
- Find a Transmission Shop
- 8 Options if Your Transmission Has Failed
- Lucas Fluid Review – Can it Fix Leaks?
- Join our forum to ask our expert Marc a question
Over to You
We're interested to know – what was the cause of your leak and what did you do to get it fixed? Let other readers know by leaving a comment below!
how much to fix oil leak
Source: https://www.transmissionrepaircostguide.com/fluid-leak/
Posted by: cannonsucan1942.blogspot.com
0 Response to "how much to fix oil leak"
Post a Comment